 icon; the "input
& output" window will appear, and you can make the required function
operations here.
icon; the "input
& output" window will appear, and you can make the required function
operations here.22.5 Dashboard Management Functions
Dashboard Editor provides the management functions of the Widget, Dashboard, and Dashboard Project, which can input and output the Widget and Dashboard for cross-project use, as well as reduce development time intervals and backups. It can also make backups and provide input for the entire Dashboard project.
In the functional
menu bar of the Dashboard editor, click on the icon; the "input
& output" window will appear, and you can make the required function
operations here.
The Import & Export dialog size is 680px cross 500px. The browser size must be greater than this size.
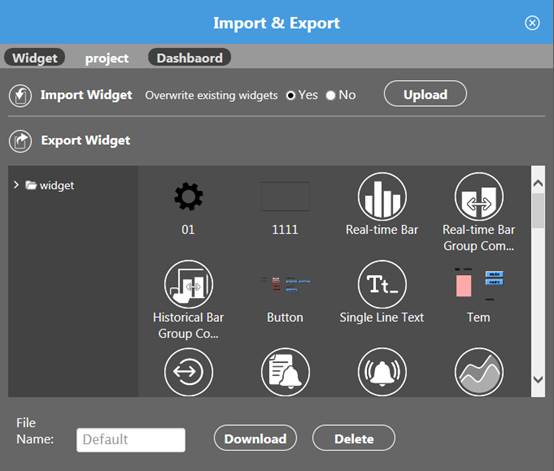
22.5.1 Widget Output
This function can output the built-in Widget in the Widget toolbox or the Plug-in Widget into the computer hard disk as backups or for use in other projects. Users shall follow the steps below:
1. Click the widget to be output into the Dashboard Editor.
2. Click input/output
icon .
3. Click on the "Output Widget" in the dialog box.
4. Select the Widget to be output in the Widget list.
5. Enter the file name to be saved and press the "Download" button.
6. At this point, the Widget will automatically download the Zip file into the hard drive, and the default storage location can be changed in the browser.
22.5.2 Widget Input
The function option can be moved from the Widget Zip in the computer hard drive into the Widget toolbox.
To input the Widget, please perform the following steps:
1. In the "Input & Output" dialog box, select "Input Widget" function.
2. First, select "Whether to Cover the Widget" and click the "Upload" button. Select the files to be input from the pop-up window.
If you select Widget storage without coverage, the system will carry out the following actions based on the type of Widget:
1. If the input Widget is an original built-in Widget, it will retain the existing Widget after input.
2. If the input Widget is an original Plug-in Widget, the existing Widget will be retained after input.
3. If the input Widget has been developed by the original Widget developer, after input, the two Widgets will be retained, but the new Widget name will have a number after its name.

22.5.3 Dashboard Output
Users can back up the matched measuring points and the set Dashboard using this function or can use them in other projects.
1. Select the "Dashboard" tab from the "Input & Output" dialog box.
2. Select the name of the Dashboard in the tree list of the "Output Dashboard" block.
3. To specify the name of the downloaded file, please input the file name; otherwise, the Default will be used as the preset file name.
4. After pressing the ”Download” button, the Dashboard will be saved into a Zip file with the specified file name. The save path will be the default browser file path.
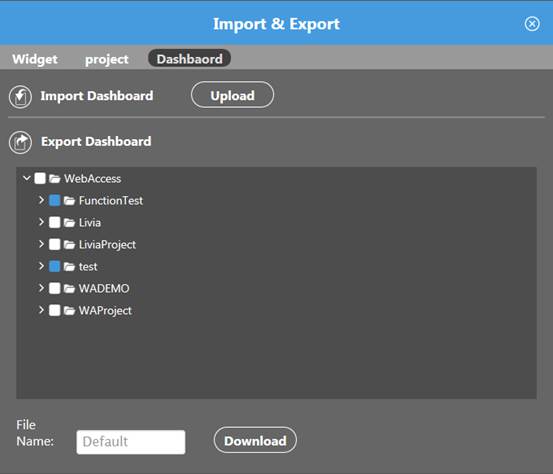
22.5.4 Dashboard Input
The user can input the previous backup Dashboard through this function; the input file shall be the compressed Zip files.
The input method is as follows:
1. Select the "Dashboard" tab from the "Input & Output" dialog box.
2. Click on the "Upload" button next to the "Dashboard" button to select the specified file.
If selecting Dashboard without coverage, the system will add a number in front of the new Dashboard file name.
If the Widget in the Dashboard has the same name as an existing Widget, the following actions will be performed based on the type of Widget:
1. If the input Widget is an original built-in Widget, it will retain the existing Widget after input.
2. If the input Widget is an original Plug-in Widget, the existing Widget will be retained after input.
3. If the input Widget has been developed by the original Widget developer, after input, the two Widgets will be retained, but the new Widget name will have a number after its name.

Please note, the new Dashboard data cannot be passed into the old Dashboard. Before importing, please confirm the version first.
22.5.5 Output Dashboard Project
The user can pack the Dashboard of the entire project to pass into the hard drive for backup.
The operating flow is as follows:
1. Select the "Project" tab from the "Input & Output" dialog box.
2. Select the project in the "Output Project" block.
3. Put in a file name or save it under the default name.
4. Press the "Download" button, and it will be automatically saved to the computer hard drive. The saving path shall be the same as the browser default.
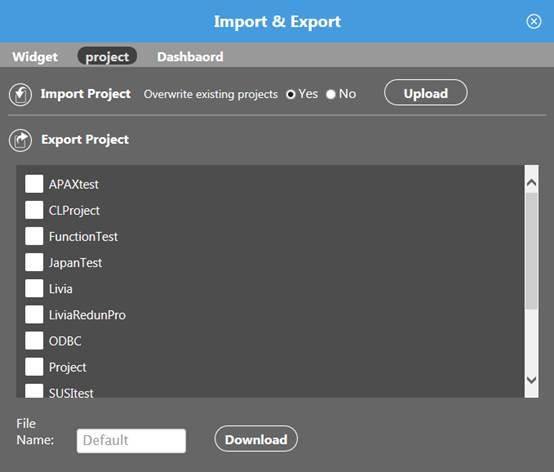
22.5.6 Dashboard Project Input
The user can input the previous backup Dashboard project into the current project.
The operating mode is as follows:
1. Select the "Project" tab from the "Input & Output" dialog box.
2. After selecting whether to cover the existing project, click on the "Upload" button next to the "Input Project" and select the desired file.
If choosing to cover the existing project, the input project will replace the existing project. If the built-in Widget has been developed by the Widget developer, it will not cover the existing Widget, and, instead, they will co-exist.
If selecting the existing project without coverage, the system will provide input without any changes.
